
Getting Started with PKI Agent
Requirements: PKI Agent
Contents
Introduction
PKI Agent bridges the gap between system certificates and browsers. With PKI Agent, you can sign web application data in your browser using the certificates on your local machine. Web applications communicate with PKI Agent over a simple REST API to initiate the signing process. PKI Agent runs on the system, outside of the browser, and prompts the user to select a certificate to use for signing.
PKI Agent only listens for requests from localhost and always requires the user's approval before a signature is created. PKI Agent supports certificates from all common sources including:
- Hardware tokens such as YubiKey, DigiCert, and any PKCS#11 compatible device.
- Certificates installed in the Windows Certificate Store.
- File-based certificates including PFX and PEM files.
Setting up PKI Agent
The PKI Agent application must be installed on the local system before signing. Once it is installed, the application can be configured to share selected certificates.
When a signature is requested, PKI Agent will display a prompt so that the user can approve the signing request and choose the certificate to use for the signature. During a signing operation, the data to be signed is sent to PKI Agent, and the signature is created locally and sent back in the response. The private key associated with the signature remains on the local system and is not exposed.
Adding Certificates
When PKI Agent is running, you can find its icon in the system tray. To open the certificate sharing window, double-click the icon or right-click and choose Certificates....
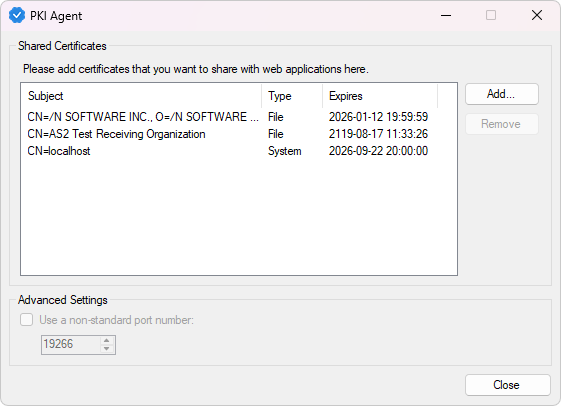
To add a new certificate, click the Add... button. A new dialog window will open where you can choose the type of certificate you want to load and then enter its details:
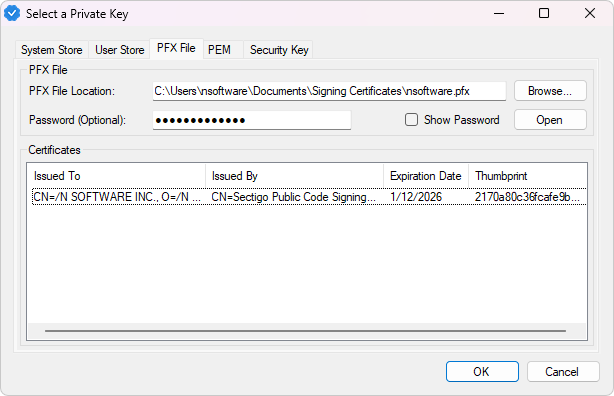
PFX and PEM Files
For PFX or PEM files, select the PFX File or PEM File tab as appropriate. Browse to the location of the file on your system, enter the password, and click Open to open the file. For a PFX file, choose the specific certificate you want to use from the list before clicking OK.
Windows Certificate Stores
To use a certificate from either the system certificate store or the current user's certificate store, navigate to either the System Store or User Store tab and select the desired certificate from the list.
Security Keys / PKCS#11
For hardware tokens, go to the Security Key tab and browse to the PKCS#11 driver provided by your hardware token manufacturer. This driver may be installed with tools provided by your hardware token manufacturer or may be provided as a separate download. For example, the "SafeNet Authentication Client" software used by many certificate authorities will install a PKCS#11 driver at C:\Windows\System32\eTPKCS11.dll.
Once you have added all the certificates you want to use with PKI Agent, close the window, right-click the PKI Agent icon in the system tray, and choose Start to start the server.
Authorizing a Signing Request
When an application makes a signing request, PKI Agent will display a dialog to the user showing both a code and an application name.
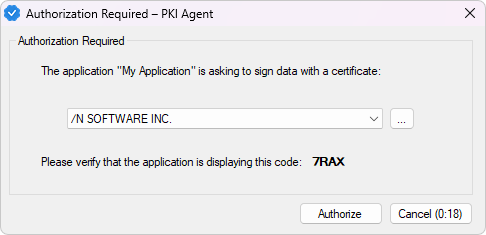
On that window, verify that both the code and application name match the values displayed in the web application, then use the drop-down menu to select the certificate to sign with and click Authorize. If you click Cancel or if the 30-second timer expires, the request will be denied.
You can also use the ... button in the authorization window to open the certificate selection dialog and choose a certificate from your system that isn't on the list. The timer will pause while you are selecting a certificate, and the certificate you choose will remain in the list for future requests.
Using the REST API
A web application can request a signature from PKI Agent by using the REST API. Requesting a signature with consists of two steps:
First, the browser should send a request to the authorization endpoint, which will prompt the PKI Agent user to grant permission. The response to that request will contain information on the certificate selected by the user, as well as an authorization token for the second request.
Second, the browser should send an HTTP POST request to the signing endpoint, containing either the data to be signed or a hash of the data. By using the token from the first request, no user interaction is required for this step.
NOTE: For any request or response that uses JSON format, all binary data should be encoded as a hexadecimal string.
Authorization
The first step in signing with the PKI Agent REST API is to make a request to the authorization endpoint, /authorize. The following JavaScript code creates and sends an authorization request:
// Prepare the authorization request
const pin = Math.random().toString(36).slice(2, 6).toUpperCase();
// Display the PIN and application name to the user here
// Send the authorization request
const authUrl = `http://127.0.0.1:9267/authorize?pin=${pin}&origin=My%20Application`;
const response = await fetch(authUrl, { method: 'GET' });
if (!response.ok) {
  throw new Error("Signing request rejected. Failed to obtain authorization.");
}
// Parse the token from the response
const resp = await response.json();
var token = resp.cred;
To begin, pick a random PIN for this authorization request and display it to the user in the browser along with the name of your application. When the request is sent, PKI Agent will show the user a popup window containing the PIN and application name, so they can verify that the information matches and grant permission for signing.
The response from the authorization request will be in JSON format and contain an authorization token along with information on the selected certificate:
{
  "cred": "7530726a6d396431386d31717a326977326f6f7474393271646333356f646f69",
  "credtype": "Token",
  "service": "",
  "objects": [
    {
      "id": "59016E1DB603_c1d63efc135d7e14e1274aa1ba503e8107abc3aa4299585c39b4808377d6f17b",
      "class": "privatekey",
      "private": false,
      "sensitive": false,
      "exportable": false,
      "readonly": false,
      "group": "49440003353930313645314442363033",
      "label": "Private Key 3",
      "value": "",
      "fingerprint": "",
      "validfrom": "",
      "validto": "",
      "subject": "",
      "friendlyname": "",
      "alg": "rsa",
      "algparams": [],
      "size": 0,
      "ops": {
        "encrypt": true,
        "decrypt": true,
        "sign": true,
        "verify": true,
        "hash": false,
        "signrecover": false,
        "verifyrecover": false,
        "wrap": false,
        "unwrap": false,
        "derive": false
      },
      "props": [
        {
          "prop": "publickey",
          "propval": "3082020A0282020100C1...61AE6267EDE7F30203010001"
        }
      ]
    },
    {
      "id": "59016E1DB603_30561067f607cf21c598c8337435bfb9ef1d4fbb6334934a7c8a194f3e9ab7d0",
      "class": "certificate",
      "private": false,
      "sensitive": false,
      "exportable": false,
      "readonly": false,
      "group": "49440003353930313645314442363033",
      "label": "Certificate 3",
      "value": "30820646308204aea00302...c948a83fc0b8e47470dc95c7",
      "fingerprint": "2170a80c36fcafe9b0a2f5ce150ccdd496c7203d",
      "validfrom": "20230112",
      "validto": "20260112",
      "subject": "C=US, S=North Carolina, O=/N SOFTWARE INC., CN=/N SOFTWARE INC.",
      "issuer": "C=GB, O=Sectigo Limited, CN=Sectigo Public Code Signing CA R36",
      "serialno": "b090e0833143d13237e122ac8720e49d",
      "friendlyname": "",
      "size": 1610,
      "props": []
    }
  ]
}
Signing
The next step is to send the signing request itself to the /sign endpoint as an HTTP POST request. The request and response can use either binary or JSON data:
Option A (Binary data and response):
const signUrl = `http://127.0.0.1:9267/sign?token=${token}`;
const buf = new TextEncoder().encode("MyData");
const signResponse = await fetch(signUrl, {
  method: 'POST',
  headers: { "Content-Type": "application/octet-stream" },
  body: buf
});
if (!signResponse.ok) {
  throw new Error("Signing authorization expired or request failed.");
}
// Encode the signature from the response
const binarySignature = new Uint8Array(await signResponse.arrayBuffer())
const signature = [...binarySignature]
  .map(x => x.toString(16).padStart(2, '0'))
  .join('');
This request uses the token from the authorization response as a token query parameter. By doing so, the user does not have to grant permission through the prompt window again. The contents of the request are binary data, and the signature is returned as a binary DER signature.
Option B (JSON data and response):
const signUrl = `http://127.0.0.1:9267/sign?token=${token}&fmt=json`;
// Build the request JSON
var hexEncodedData = [..."MyData"]
  .map(x => x.charCodeAt().toString(16).padStart(2, '0'))
  .join('');
const buf = new TextEncoder().encode(JSON.stringify({
  plaintext: hexEncodedData,
  alg: {
    name: "sha256WithRSAEncryption",
    props: []
  }
}));
// Send the request
const signResponse = await fetch(signUrl, {
  method: 'POST',
  headers: { "Content-Type": "application/octet-stream" },
  body: buf
});
if (!signResponse.ok) {
  throw new Error("Signing authorization expired or request failed.");
}
// Parse the signature from the response
const signResp = await signResponse.json();
const signature = signResp.signature;
This request uses the token from the authorization response as a token query parameter. By doing so, the user does not have to grant permission through the prompt window again. The plaintext field in the request body contains the binary data to be signed, converted to a hex string for transmission. The alg field can be used to specify an algorithm to use for signing.
The response will contain a hex-encoded DER signature along with information about the certificate used to create the signature:
{
  "signature": "46d77d860ca5f9021f7f6b612...e32d53048d7027e980d22e85f8f",
  "trace": "",
  "objects": [
    {
      "id": "59016E1DB603_c1d63efc135d7e14e1274aa1ba503e8107abc3aa4299585c39b4808377d6f17b",
      "class": "privatekey",
      "private": false,
      "sensitive": false,
      "exportable": false,
      "readonly": false,
      "group": "49440003353930313645314442363033",
      "label": "Private Key 3",
      "value": "",
      "fingerprint": "",
      "validfrom": "",
      "validto": "",
      "subject": "",
      "friendlyname": "",
      "alg": "rsa",
      "algparams": [],
      "size": 0,
      "ops": {
        "encrypt": false,
        "decrypt": true,
        "sign": true,
        "verify": false,
        "hash": false,
        "signrecover": false,
        "verifyrecover": false,
        "wrap": false,
        "unwrap": false,
        "derive": false
      },
      "props": [
        {
          "prop": "publickey",
          "propval": "3082020A0282020100C146...267EDE7F30203010001"
        }
      ]
    },
    {
      "id": "59016E1DB603_30561067f607cf21c598c8337435bfb9ef1d4fbb6334934a7c8a194f3e9ab7d0",
      "class": "certificate",
      "private": false,
      "sensitive": false,
      "exportable": false,
      "readonly": false,
      "group": "49440003353930313645314442363033",
      "label": "Certificate 3",
      "value": "30820646308204aea0030201...dd1da34c948a83fc0b8e47470dc95c7",
      "fingerprint": "2170a80c36fcafe9b0a2f5ce150ccdd496c7203d",
      "validfrom": "20230112",
      "validto": "20260112",
      "subject": "C=US, S=North Carolina, O=/N SOFTWARE INC., CN=/N SOFTWARE INC.",
      "issuer": "C=GB, O=Sectigo Limited, CN=Sectigo Public Code Signing CA R36",
      "serialno": "b090e0833143d13237e122ac8720e49d",
      "friendlyname": "",
      "size": 1610,
      "props": []
    }
  ]
}
If one of the signature algorithms containing "pkcs7" is specified in the alg parameter, the response will be a PKCS#7 signature. Otherwise it will be a PKCS#1 signature.
If the sha224pkcs7, sha256pkcs7, sha384pkcs7, sha512pkcs7, or hashpkcs7 algorithms are used, the request should contain the raw data to be signed, and PKI Agent will calculate a hash of the data and sign the hash. If hashpkcs7 is used, it will determine the best hash algorithm to use based on the private key used for signing.
If the pkcs7 algorithms is selected, PKI Agent will expect the input data to contain a hash, and will sign the data directly. The halg query parameter can be used to tell PKI Agent which algorithm was used to create the hash.
We appreciate your feedback. If you have any questions, comments, or suggestions about this article please contact our support team at support@nsoftware.com.