
Add SSO with Google Identity using SAML 2.0
Requirements: Cloud SSO
Introduction
The Security Assertion Markup Language 2.0 (or SAML 2.0) is a flexible protocol that was designed to cover a wide variety of scenarios called "profiles". A common profile called Web SSO defines a standardized way for applications to add Single Sign-on (SSO) support to their applications. SSO-enabled applications (also known as Service Providers) delegate authentication to authentication servers (also known as Identity Providers). For example, Google Identity is a widely used Identity Provider that allows users to log in to supported applications using the Google account assigned to them by their organization.
BBecause SAML 2.0 is flexible in what it offers, it is often complex to configure and implement. The SAMLWeb and SAMLDesktop components from Cloud SSO simplifies the implementation with an easy-to-use interface. The components handles interpreting metadata documents, building authentication and logout requests, and parsing and validating responses.
Before getting started, a few terms should be defined:
- Identity Provider—A server that issues SAML assertions about an authenticated subject.
- Service Provider—An application that relies on an Identity Provider for authentication.
- Subject—An entity (typically a user) that will be authenticated by the Identity Provider for a Service Provider.
- Assertion—An XML message that contains security information and details about a subject.
- Protocol Binding—A description of the communication protocols (i.e., HTTP-Redirect or HTTP-POST) being used by the Identity Provider and Service Provider.
In the following guide, we will set up Google Identity as the Identity Provider for your application, which will use the SAMLWeb component to act as a Service Provider. Though we mainly focus on the SAMLWeb component, the SAMLDesktop component is very similar. See desktop considersations for options during the setup and the example at the end of the article for the SAMLDesktop component.
Contents
- How SAML Works
- Creating a New SAML Application
- Authenticating a User with the SAMLWeb component
- Additional Notes
How SAML Works
SAML 2.0 typically follows the same flow for Web SSO. Before starting, the Service Provider configures the Identity Provider with knowledge about how to communicate with it and vice versa. Then a user of the Service Provider requests to be authenticated. The Service Provider will build an authentication request and communicate it to the Identity Provider's SingleSignOnService URL using the specified protocol binding. Typically, HTTP-POST and HTTP-Redirect are both supported by Identity Providers.
Next, the Identity Provider will go through the process of authenticating the current user. This step may be skipped if the user already has an authentication session with the Identity Provider. Once the user has been authenticated, the Identity Provider will issue an assertion using the authenticated user as the subject. Depending on the Identity Provider, it will then XML sign the assertion, the SAML response, or both before sending the SAML response back to the Service Provider to the specified AssertionConsumerService URL. The URL will also specify a protocol binding that does not need to match the protocol binding used by the SingleSignOnService. Typically, because of the size of the response, HTTP-POST is used.
The AssertionConsumerService (ACS) URL will receive the HTTP request and parse the SAMLResponse parameter from it. It will then validate and parse the SAML response and its accompanying assertion. If everything checks out, the Service Provider can then allow the current user to be logged in.
Creating a New SAML Application
Support for SAML is provided only through the Google Admin Console, which means you will need to have access to a Google Admin account to be able to create and configure the SAML application within Google Identity.
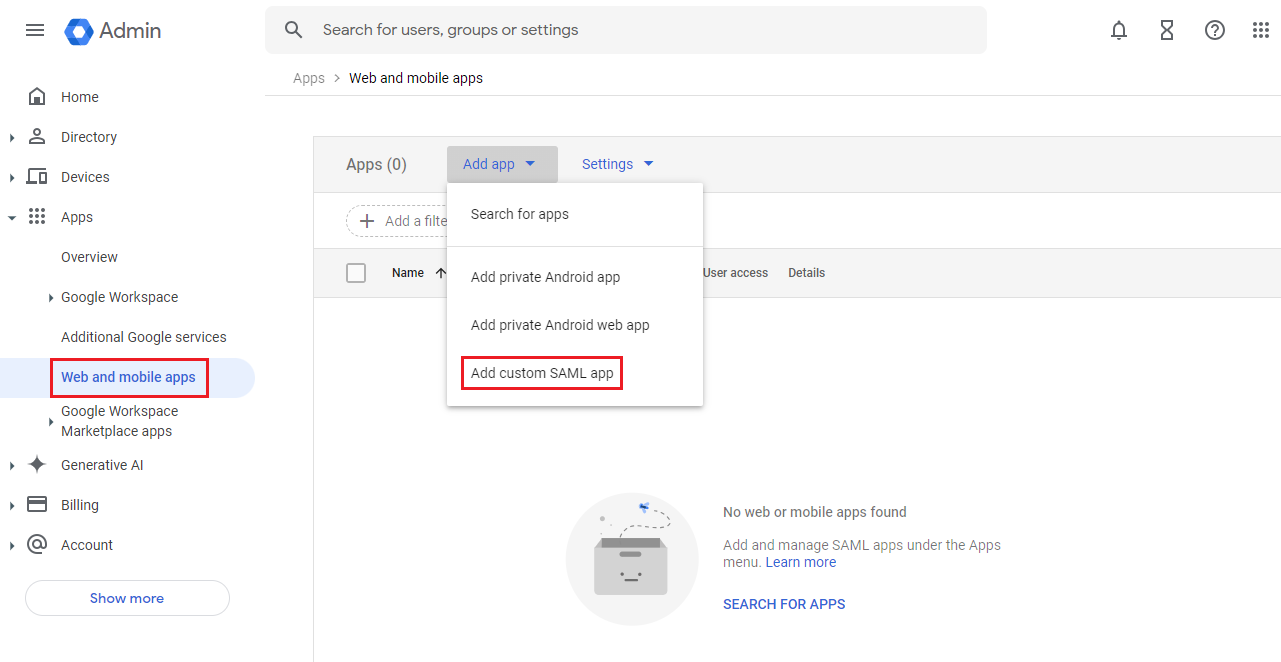
From the Google Admin Console, navigate to "Apps->Web and Mobile Apps" to begin. The "Web and Mobile Apps" page provides a full list of the organization's web and mobile applications. To create a new SAML application, select "Add Custom SAML App" from the "Add App" dropdown menu.
The Google Admin Console will prompt you with the name, description, and logo of the application. These values are used only when presenting the name of the application and are not used by the SAML component. Once satisfied with the name, description, and logo of the application, select "Continue" to move to the next step.
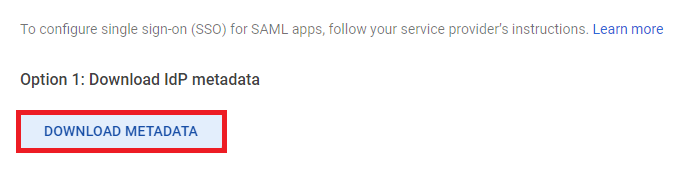
On the next page, you will be prompted to download the "IdP Metadata", which stands for "Identity Provider Metadata". This metadata will need to be provided to the SAML component so that it can interact with Google as an Identity Provider. Each metadata file from Google is specific to the application from which it is downloaded. If multiple applications are created, it is important to keep track of which metadata document belongs to which application. Once downloaded, select "Continue" to move to configuring the Service Provider information.
The Google Admin Console will now prompt you to provide information about your Service Provider (i.e., your application). The following information can be provided to configure how Google Identity will interact with your Service Provider.
Assertion Consumer Service
The Assertion Consumer Service URL or ACS URL is required by Google Identity. It defines the location within your web application that will handle the authentication responses from Google Identity. This location will receive a SAML response through the HTTP-POST binding (more on that later). In the following example, we have set this to "https://example.com/saml2/consume", which is where we will be processing the SAML response in the following sections. See Desktop Consideration for more information about ACS URLs for desktop applications.
Entity Id
The Entity Id is also required by Google Identity. It is the unique Id for the Service Provider and should be a unique value within the organization. The Entity Id will be set to "ServiceProviderId" in the following example.
Start URL (Relay State)
The Start URL is an optional setting. When this value is set, Google Identity will set the RelayState to the specified value if it was not set in the authentication request. The RelayState is typically used by the Service Provider to keep track of where a user is in the application when they requested to be authenticated. This is often useful in applications in which certain sections of the application are accessible to everyone. If someone has navigated through a website, when they login, they typically expect to be put back at the location where they started the request. If the RelayState is not set, this can then be the default location to place users at when they log in. The following example uses "https://example.com/dashboard" as the Start URL.
Signed Responses
By default, Google will sign the assertion only when responding to a SAML authentication request. The Google Admin Console does provide the option to have Google sign both the SAML response and assertion if desired rather than just the assertion. In the following example, the Service Provider will request that both the SAML response and the assertion be signed.
Name Identifier
When an Identity Provider issues an assertion, they will issue it for a specific subject. For identification purposes, a subject will contain a "Name Identifier", which is typically unique to the user. Google, for example, defaults to using the user's email address for said identifier. Other options offered by default are using the user's first or last name. Additionally, if any custom attributes have been added for users, those attributes can be used as well. The following example uses the default configuration.

Additional Mappings
Once finished, you can optionally add more attribute mappings that will be included in the assertion's attribute statement. Along with any additional attributes, you can also can provide information about the groups to which a user belongs. Once satisfied with the mappings, select "Finish" to create a new SAML application.
Desktop Considerations
When setting up the SAML application to be used with the SAMLDesktop component, it is typical to use a localhost URL rather than a hosted domain. This is due to the SAMLDesktop component hosting an embedded web server for your desktop application. For localhost URLs, Google required SSL/TLS to be used. Since HTTPS is required the SAMLDesktop component needs to enable SSL/TLS for its embedded webserver. Additionally, the localhost URL that is configured must specifiy a port number. For example "https://localhost:8080" would be a valid localhost URL. The specified port must be specified for the component as well.
Authenticating a User with the SAMLWeb component
The following example assumes that the following is true about the application. First, the domain for the web application is "example.com" and the web server supports HTTPS. Next, the application will be making requests using the HTTP-Redirect binding but receiving responses using the HTTP-Post binding. Finally, the web server has a specific location for handling responses that is separate from the locations that a user interacts with. In the previous section, the following information was configured.
- ACS URL—https://example.com/saml2/consume
- Entity Id—ServiceProviderId
- Name Id—User's Email
Additionally, we have requested that both the SAMLResponse and Assertion elements be signed when the Identity Provider issues the assertion. Finally, we have downloaded the SAML metadata document.
Configure Metadata
Before building a SAML request or processing a SAML response, the component will need to be configured with information about the Service Provider and Identity Provider. The following will always need to happen.
First, the Identity Provider's information needs to be requested, or if already cached, loaded into the component. To request the metadata document, use the RequestIdentityMetadata method, which accepts a URI. If the Identity Provider's metadata is already cached or downloaded, the LoadIdentityMetadata method can be used to load the metadata either from a file or directly through a string. Once either method is finished, the IdentityProviderMetadata, IdentityProviderSigningCert, and IdentityProviderURIs properties are populated. Because Google offers the metadata only through a downloadable file, we will use the LoadIdentityMetadata method instead of the RequestIdentityMetadata method:
saml.LoadIdentityMetadata("./GoogleIDPMetadata.xml");
Second, the component needs to0 know the AssertionConsumerService URI being used by the application. If the application uses multiple endpoints, each one can be loaded into the ServiceProviderURIs collection. Google, however, only supports having a single ACS and only supports using the HTTP-POST binding, so we will add that single URI to our application:
URI acs = new URI();
acs.URIType = SAMLURITypes.sutACS;
acs.Location = "https://example.com/saml2/consume ";
acs.BindingType = subPost;
saml.ServiceProviderURIs.Add(acs);
With these two steps, we are now ready to build a SAML request for authenticating a user.
Build a SAML Request
Along with the setup steps, we need to configure the component to know how we want our request formatted. Because Google does not offer many customization options, we will only be configuring the RelayState property and the Issuer and Binding fields from the SAMLRequestSettings property. Once the SAML request has been configured, the BuildAuthnRequest method will create the request. In addition to configuring the component to build the SAML request, you will need to save the Id and Issuer fields for validation later.
Relay State
The RelayState parameter is similar to the State parameter if you are familiar with OAuth or OpenId Connect. If an Identity Provider is provided with the RelayState parameter during a SAML request, it will return the exact value in its response. For example, if the Service Provider sets the RelayState to "value1", then along with the SAMLResponse parameter, the Identity Provider would also set the RelayState parameter to "value1". The RelayState parameter is separate from the SAMLResponse parameter and is not found within the SAML response.
A real-world example of how the RelayState parameter could be used is to keep track of where a user is in the application when they request to be authenticated. This allows your application to return the user to their previous location so they have a smoother experience. For our example, we will be setting the RelayState parameter to "https://example.com/dashboard" so that our application can return the user to the dashboard of our application.
Issuer
The Issuer field in the SAMLRequestSettings property needs to be set to the Entity Id that was configured during the setup phase. This configures the component to issue the SAML request in the name of your registered Service Provider. In our example, this will be set to "ServiceProviderID".
Request Binding
The Binding field in the SAMLRequestSettings property defines the binding that will be used by the application to make the request. Depending on how this field is set, the component will change how the SAML request is built. Typically, the HTTP-Redirect binding is used, which is what we will be using in our example. When configured this way, only the SAMLRequestURL property will be set.
SAML Request Example
This example shows how to build a SAML request using the HTTP-Redirect binding that will be for Google, which is acting as the Identity Provider. The example saves the SAML request's Id to a safe location for later.
//Setup Request
saml.SAMLRequestSettings.Issuer = "ServiceProviderID";
saml.SAMLRequestSettings.Binding = SAMLBindings.sbHTTPRedirect;
saml.RelayState = "https://example.com/dashboard";
//Build Request and Save Request ID
saml.BuildAuthnRequest();
string requestId = saml.SAMLRequestSettings.Id;
//Redirect the User
Redirect(saml.SAMLRequestURL);
Parse and Validate a SAML Response
After the user has authenticated with the Identity Provider, the user will be redirected back to your application. The location of this redirect is defined by the ACS URI that is configured during the metadata phase. Because the example uses the HTTP-POST binding for the ACS URI, the response will have two parameters. The first will be the SAMLResponse parameter, and the second will be the RelayState parameter. The SAML component will then process the SAML response by parsing and validating the SAMLResponse parameter and its assertion.
The component will need to be configured with the same setup settings (e.g., Identity Provider's Metadata and Service Provider's URIs) for validation and verification reasons. Additionally, the Id and Issuer fields in the SAMLRequestSettings property will need to be configured because they are also needed to validate SAML responses.
Providing the SAMLResponse to the Component
The SAMLResponse parameter can be provided to the component in three different ways. First, if the component is being used in an ASP.NET or Java Spring project, the component can get the SAMLResponse directly from the environment. This is the HTTPContext for ASP.NET and the HttpServletRequest for Java Spring. If using ASP.NET Core, this HTTPContext will need to be provided in the constructor when creating the SAML object.
Second, if the component is being used in a different web project, then it will need to be provided with the necessary information. If the project provides the raw HTTP headers and body, the SAMLResponseHeaders and SAMLResponseBody properties can be set with those values. The SAMLResponseHeaders need to contain both the HTTP request line and the HTTP headers for the component to be able to properly parse the information needed.
Third, if the project provides the parsed values, set the ResponseContent field from the SAMLResponseInfo property with the parsed SAMLResponse parameter. The SAMLResponse parameter can be left in Base64 encoding but needs to be URL-decoded before providing it to the component.
Configuring SAMLRequestSettings
The Id and Issuer fields in the SAMLRequestSettings property need to be configured so the SAML component can validate the SAMLResponse parameter and its assertion correctly. The Id field is used to validate the InResponseTo attribute to ensure that the SAML response being validated is "in response to" a request made by this application.
The Issuer field is used to validate the Audience element found within the assertion. The Audience element describes who the assertion is meant to be used by. It is important to trust only those assertions that were meant for the intended Service Provider and not for some other Service Provider.
In some projects, it is not a simple task to know these values beforehand. In these cases, the SAMLResponse and Assertion events will fire with the values that were parsed from the SAML response. You can then use the values to check whether or not they exist in your system and set the fields accordingly if they are present.
SAMLResponse Example
In this example, we provide the HTTPContext to the SAML constructor before loading in the Identity Provider's metadata information and the Service Provider's ACS URI. This way, the SAML component will parse the SAMLResponse parameter directly from the HTTPContext. It will then configure the Issuer and Id fields in the SAMLRequestSettings property before calling ProcessSAMLResponse.
//Create new SAML Object, passing in the HttpContext
SAMLWeb saml = new SAMLWeb(HttpContext);
//Load Identity Provider's Metadata
saml.LoadIdentityMetadata("./GoogleIDPMetadata.xml");
//Configure Service Provider's ACS URI
URI acs = new URI();
acs.URIType = SAMLURITypes.sutACS;
acs.Location = "https://example.com/saml2/consume ";
acs.BindingType = subPost;
saml.ServiceProviderURIs.Add(acs);
//Configure saved information about the SAML request.
saml.SAMLRequestSettings.Issuer = "ServiceProviderID";
saml.SAMLRequestSettings.Id = requestId;
//Process the SAML response.
saml.ProcessSAMLResponse();
Additional Notes
Process versus Parse
Typically, the ProcessSAMLResponse method is all that is needed to parse and validate a SAML response. If special circumstances are required, then the Parse* and Validate* methods can be used to manually go through each step that the ProcessSAMLResponse method would normally handle. The following methods would be equivalent to the ProcessSAMLResponse method.
- ParseSAMLResponse
- ValidateSAMLResponse
- ParseAssertion
- ValidateAssertion
Note: When using these separated methods, the Parse* methods must be called before the Validate* methods so that the component has the information needed to validate the SAMLResponse or assertion. For this reason, if the SAMLResponse or assertion has not already been validated, the information from the Parse* methods should be trusted only after the methods have been called.
Validation Process
When the SAML component validates a SAML response or assertion, it will follow the same steps whether the ProcessSAMLResponse method is used or the ValidateSAMLResponse and ValidateAssertion methods are used. In certain situations, your application may want to skip certain checks. The SAMLResponseValidationFlags and AssertionValidationFlags configuration settings can be configured to control which checks are skipped by the SAML component when validating.
When validating a SAML response, the following elements or attributes are verified and validated:
- Signature
- Issuer
- InResponseTo
- Destination
- Status
When validating an assertion, the SAML component has to check more attributes and elements than when it checks the SAML response. The following sections (each with multiple checks) are verified and validated in an assertion:
- Signature
- Issuer
- Conditions
- Subject
- AuthnStatement
Signature
Although optional for both a SAML response and assertion, typically at least one (if not both) is signed by the Identity Provider. These signatures are verified to ensure that a third party has not tampered with the response. To verify a signature, the IdentityProviderSigningCert property needs to be set. Typically, this is populated through the RequestIdentityMetadata or LoadIdentityMetadata methods.
Issuer
The Issuer element is required to be present in the SAMLResponse and the Assertion elements. This element allows the SAML component to ensure that the Identity Provider that has been configured is the one that issued the SAML response and assertion. To validate this, the component requires that the EntityId field is set in the IdentityProviderMetadata property.
Conditions
The Conditions element is found only in an assertion. They describe various conditions that need to be met for the assertion to be considered valid. First, the NotBefore and NotOnOrAfter attributes are checked to ensure that the assertion is still in a valid time period. If it is expired, a new assertion should be requested.
Next, the AudienceRestriction element is checked, which is within the Conditions element. An AudienceRestiction element is made up of one or more Audience elements. An Audience element allows the Identity Provider to describe who the assertion was intended for. This Audience element must match the Entity Id ("ServiceProviderId") of your configured Service Provider. To configure the SAML component to correctly check this, the Issuer field in the SAMLRequestSettings property must be set to the Service Provider's EntityId.
Subject, InResponseTo, and Destination
When validating a SAML response and assertion, the InResponseTo attribute needs to be checked. For a SAML response, this is found in the SAMLResponse element, while in an assertion, it is found within the SubjectConfirmationData element. The InResponseTo attribute is used to check that the SAML response or assertion is "in response to" a SAML request made by the Service Provider. Before validating, the Id field in the SAMLRequestSettings property must be set to the Id of the matching request.
The SAMLResponse element has a Destination attribute and the assertion's SubjectConfirmationData element has the Recipient attribute. These two attributes check for the same information, ensuring that the SAML response and assertion were received by the intended Assertion Consumer Service endpoint. The SAML component checks this attribute by checking the ServiceProviderURIs collection to see if the matching URI has been added to the collection.
The assertion also checks the SubjectConfirmation element to ensure that the Method attribute is set to a valid method. The Web SSO profile defines that this method must be either bearer or sender-vouches, and any other method means the assertion should be discarded. This is automatically checked by the SAML component with no additional configuration needed.
AuthnStatement
The AuthnStatement element is unique to assertions. The only check done within this element is to ensure that the SessionNotOnOrAfter attribute has been passed, if present, in the AuthnStatement.
Status
The Status element is unique to the SAML response. When the Identity Provider is authenticating the user, it will set the Status element to the outcome of that process. Typically, this will be set to urn:oasis:names:tc:SAML:2.0:status:Success if the user was able to successfully authenticate. If an issue occurs, then the Identity Provider will set it to a matching URI to inform the Service Provider why the user was unable to successfully authenticate. Any value that is not the success value is considered a failure when validating.
Access and Use an Assertion
Once the SAML response and the assertion have been parsed and validated by the SAML component, the user represented by the assertion can be considered authenticated. Assertions can contain more information than just proof that a user was authenticated by the Identity Provider. An assertion is typically broken up into three sections of information. The first is general information about the assertion. The other two are the AuthnStatment and AttributeStatement elements. As a note, an assertion can have multiple statements of the same type.
Generally, an assertion will contain information about a user, typically referred to as the "subject" of the assertion. Within a subject, the Identity Provider will define some type of name identifier. When we configured Google, we informed Google that we would want this in the form of an email. After the SAML component parses the assertion, this name identifier can be found in the SubjectNameId field in the AssertionInfo property.
Other information generally found in the assertion includes some of the common conditions about assertions, such as the ExpirationDate, NotBeforeDate, and OneTimeUse fields. These fields describe how and when the assertion should be trusted or discarded. Along with that, the Id field provides the assertion's identifier that is unique to this assertion.
AuthnStatement Element
Each AuthnStatement element provides information about the authentication event performed with the user. Information about when and how the user was authenticated along with session information are provided through these statements. If multiple statements are present, then the user has undergone multiple authentication events. These statements are parsed to the AssertionAuthnInfo collection.
The AuthnInstant field indicates when the authentication event took place for the user. The ContextClassReference and ContextDeclaration fields provide information on how the user was authenticated. The SessionIndex and SessionExpiration fields describe the session that was established between the Service Provider (your application) and the subject (your user).
AttributeStatement Element
An AttributeStatement element is made up of one or more Attribute elements associated with the subject of the assertion. Each Attribute is a key-value pair representing a piece of information about a user. Sometimes the Attribute can have multiple values per key. For example, consider the following Attribute about a user.
<Attribute Name="verified_emails">
  <AttributeValue> email@test.com </AttributeValue>
  <AttributeValue> other@example.com </AttributeValue>
</Attribute>
This Attribute is a list of emails that have been verified for the user. There are two ways to access these values using the SAML component. The first option is to use the AssertionAttributeInfo collection. This process requires that the application iterate through each AttributeStatement element in the collection, and then through each Attribute within that statement.
List<string> verified_emails = new List<string>();
for(int i = 0; i < saml.AssertionAttributeInfo.Count; i++){
  if (saml.AssertionAttributeInfo[i].Name == "verified_emails" || saml.AssertionAttributeInfo[i].Name == "verified_email"){
    for (int j = 0; j < saml.AssertionAttributeInfo[i].AttributeValueCount; j++) {
      saml.AssertionAttributeInfo[i].AttributeValueIndex = j;
      verified_emails.Add(saml.AssertionAttributeInfo[i].AttributeValueData);
    }
  }
}
The second option is to use the GetAssertionAttribute method. Although not as flexible, this method will search all the AttributeStatement elements in the assertion and return the first attribute with a matching name if found. If the attribute has multiple values, that information will be listed in a semicolon-separated string.
string[] verified_emails = saml.GetAssertionAttribute("verified_emails").Split(';');
SAMLDesktop Example
The SAMLDesktop component simplifies the SAMLWeb component further by hosting it's own web server and launching the browser for the user to use for your application. Since it is hosting it's own web server, it will also automatically retrieve, parse, and validate the SAML response as well. All of this is done with a single call to the AuthenticateUser methhod.
While most of the setup is the same, there are a few key differences. First, the ServiceProviderURIs collection is not included in the API. Instead, you setup the ACS URI using the WebServerBindings, WebServerPort, WebServerSSLCert, and WebServerSSLEnabled properties. Additionally, if using something like a relay server, the ReturnURL property can be set to specifiy a different location that will relay the SAML response to the embedded web server.
SAMLDesktop saml = new SAMLDesktop();
//Load Identity Provider's Metadata
saml.LoadIdentityMetadata("./GoogleIDPMetadata.xml");
//Setup SAML Request
saml.SAMLRequestSettings.Binding = SAMLBindings.sbHTTPRedirect;
saml.SAMLRequestSettings.Issuer = "ServiceProviderId";
//Setup Webserver/ACS URL
 saml.WebServerPort = 8080;
 saml.WebServerSSLEnabled = true;
 saml.WebServerSSLCert = new Certificate(CertStoreTypes.cstPFXFile, "localhost.pfx", "password", "*");
//Authenticate User
saml.AuthenticateUser();
We appreciate your feedback. If you have any questions, comments, or suggestions about this article please contact our support team at support@nsoftware.com.