
Enable SSO Login with Google Accounts using OpenID Connect
Requirements: CloudSSO
This article details how to enable users to log in to your application using their Google account. The sections below show how to configure your application as a Relying Party to use Google Identity for SSO, and how to configure the OIDCWeb or OIDCDesktop components from the CloudSSO toolkit for use within your application to authenticate users.
OpenID Connect (OIDC) is an extension of the OAuth 2.0 protocol designed to simplify user authentication through OpenID Providers, such as Google Identity. By building on OAuth 2.0, OIDC provides a standardized way to authenticate users and access their profile information.
The OIDCWeb and OIDCDesktop components from Cloud SSO simplifies this process with a user-friendly API, making it easy to enable SSO authentication in applications. The OIDCWeb component abstracts much of the complexity involved in implementing OIDC, allowing developers to focus on building features rather than dealing with the intricacies of authentication protocols. The OIDCDesktop trivializes the process for desktop applications by creating an embedded web server internally, removing the need for the application to handle that on its own.
Contents
- Overview
- Creating a Cloud Project
- Creating an OAuth Client
- Considerations for Desktop Applications
- Setting Up and Using the OIDCWeb and OIDCDesktop Components
Overview
Before the OIDCWeb or OIDCDesktop components can be used to authenticate users with Google Identity, a Google Cloud project and OAuth Client must be created and configured in the Google Cloud Console. It is important to understand which grant type(s) will need to be supported by the application before creating the enterprise application.
| Authorization Code | The authorization server provides an authorization code that is exchanged with a token server for an access token and an ID Token. |
| Implicit | The authorization server directly provides an access token and ID token. |
| Hybrid | The authorization server provides an ID Token and an authorization code. The authorization code is exchanged with the token server to obtain an access token. |
For the article, we will be configuring a Relying Party that is a web application using the authorization code grant type. The web application will be a simple website with the domain "example.com" which will allow users to authenticate using their Google account. For desktop applications using OIDCDesktop, there will be notes where the setup steps differ.
Creating a Cloud Project
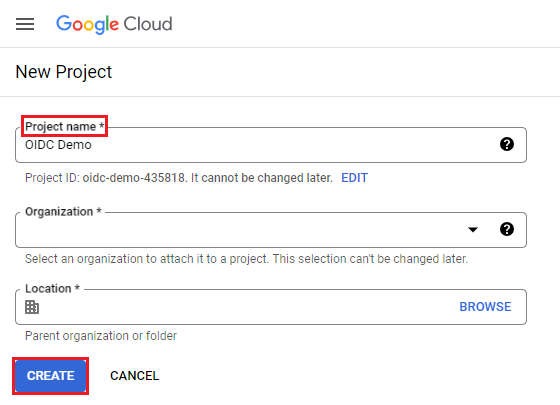
Before we start registering a project as an OpenID Connect Relying Party, we will need to have a project created in Google Cloud. If a project has not been created already, you can create a new one in the Google Cloud Console's resource management page. From there, select "Create Project" which will prompt Google Cloud to ask some questions about the new project. After some time, the project will be created and available in the resources table under the selected organization.
Once the project is available, we can start configuring an OAuth Client within the project that will represent one of the Relying Party's web applications.
Creating an OAuth Client
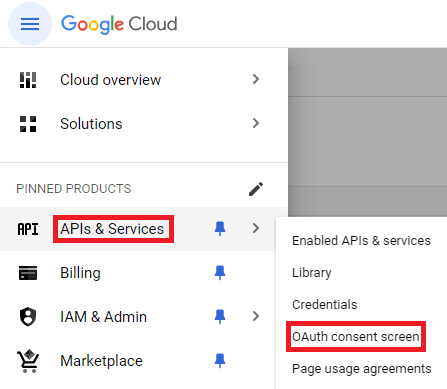
Since OpenID Connect is an extension of the OAuth 2.0 protocol, an OAuth client will need to be configured in the Google Cloud project for the Relying Party's web application to be able to make OpenID Connect requests. First, the OAuth consent screen will need to be configured. Then the OAuth credentials will be created so that the application can identify itself to Google Identity's authorization servers.
Configure the OAuth Consent screen
In OAuth 2.0, it is common for the authorization server to provide a "consent" screen to allow users the option to accept or deny third-party access to their account. Typically, this screen will provide a scope of the details and permissions the third party is requesting. Google Identity allows you to configure the look of this page to improve the user experience. An example of this page can be found below.
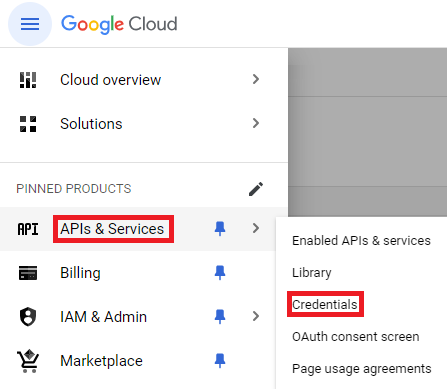
To start configuring the OAuth Consent screen, navigate to the "APIs & Services > OAuth consent screen" tab from the side menu in the Google Console. If the specific Google Cloud project has not already been selected, Google will prompt you to select the Google Cloud project that should be configured.
On the OAuth consent page, you will register some information about the Relying Party with Google, starting with the type of users that will be using your application. There are two types of users that can be selected. The Internal type is meant for users within the organization in which the project was registered. This type does not require Google to verify the project before users can use it. The external type is meant for any users with a Google account. Before projects with the external type can be deployed to production, Google must verify the Consent Page. Once the account type is selected, click "Save and Continue" to move to the next step in the registration process.
On the following page, you will be prompted for information about your application, such as the public name and the support email address. This information will be used to configure the consent screen to be personalized to your application. Once this page has been configured, clicking "Save and Continue" will move you to the final step.
In the final step, you will need to select scopes that will be used by your Relying Party. These can be modified later, but typically the openid, email, and profile scopes are common for OpenID Connect Relying Parties. Along with these OpenID Connect scopes, you can add other OAuth 2.0 scopes such as permissions to access the user's Google Drive using the Drive API. Along with the name of the scope, Google will also display the description the user will see when they are consenting to said scopes.
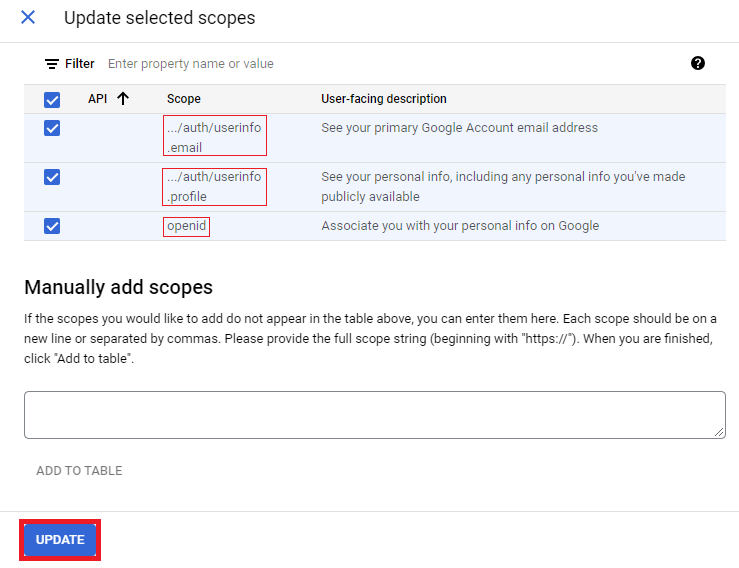
Once the scopes are selected, select "Save and Continue" to review and optionally edit the OAuth consent screen. Once the OAuth consent screen is configured, we can now register OAuth 2.0 credentials.
Create New Credentials
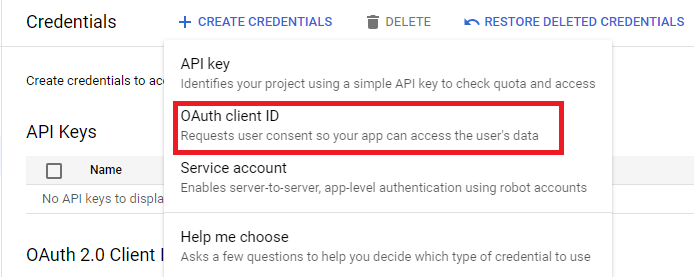
OAuth Credentials typically consist of a ClientId and ClientSecret which are tied to the specific OAuth Client within the Google Cloud project. The ClientId can be thought of as the Relying Party's username and the ClientSecret as the password. These values are used to ensure that the application that is requesting access to the user's data is not some malicious third party. As another security measure, all Redirect URIs will need to be configured with the credentials to ensure that responses are going only to their intended location. To create a new set of OAuth 2.0 credentials, you will need to navigate to the project's "Credentials" page.
Once on the project's credentials page, select "Create Credentials" to start creating a new set of credentials for the Relying Party to identify itself to Google. Make sure to select "OAuth client ID" rather than "API key" or "Service account" as those credentials are for different use cases.
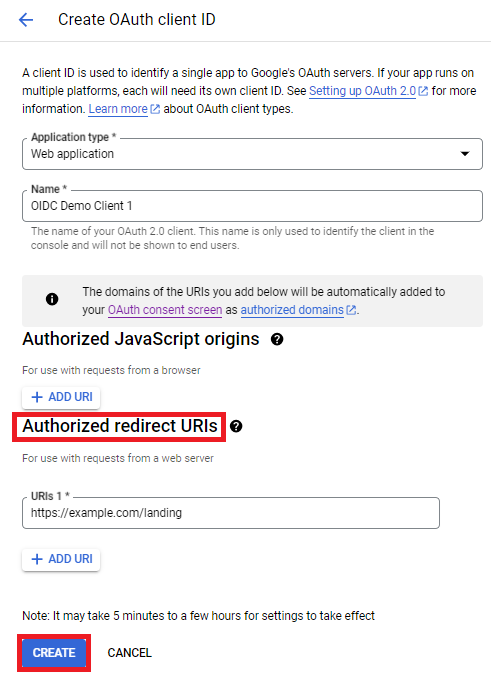
Once on the "Create OAuth client ID" page, select "Web application" for "Application type", and name the Relying Party client that is specifically going to be using these credentials. This name is only used internally by Google and is not presented to end users. Additionally, on this page, you will need to set up at least one redirect URI for your application. When a user has authenticated with Google and consented, Google will need to return the user back to your web application. As a security precaution, the location to which the user is returned must be configured with Google beforehand. In the following examples, "https://example.com/landing" has been registered as an authorized redirect URI. If there could be multiple locations in the web application to which a user could be directed, then multiple redirect URIs can be provided. Once done, click "Create" to generate a new set of credentials for your application. If building a desktop application see desktop considerations.
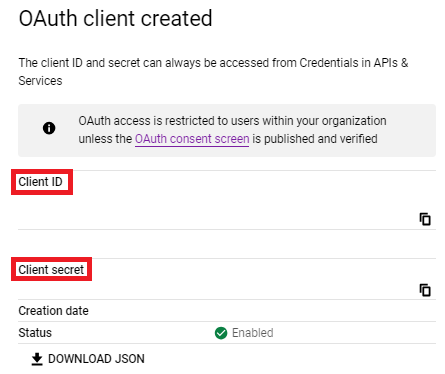
After a few moments, the OAuth client will be created, and you will be supplied with a "Client ID" and a "Client secret" which will be used by the OIDCWeb component to make requests to the authorization and token servers. It is important to save both values to a secure and easy-to-access location.
Once completed, you will now have everything set up to make basic OpenID Connect requests to Google's authorization servers. During the process, you will have configured or received the following:
- Authorization Scope(s)
- Authorized Redirect URI(s)
- Client Id
- Client Secret
Additionally, before moving on to configuring the component, you will need the location of Google's OpenID Connect Metadata document, also known as the Discovery document. Typically, this document can be found at https://accounts.google.com/.well-known/openid-configuration, but it is good to double check that this location is current.
Considerations for Desktop Applications
For the most part, the configuration process for web and desktop applications are the same. However, there are some minor difference between the two application types.
Redirect URIs and Platforms
When setting up redirect URIs for desktop applications the redirect URI needs to be set to the location of the embedded web server. By default, the OIDCDesktop component will listen using localhost on a free port. To correctly setup the redirect URI, use "http://localhost:8080" or some other port. Make note of the port that was registered, this will be needed when configuring the component to make sure that OIDCDesktop uses the same URI that was registered.
Setting Up and Using the OIDCWeb and OIDCDesktop Components
Before setting up the component within your web application, the following information will need to be collected from the OpenID Provider so that the OIDCWeb component will be able to successfully build and validate requests and responses.
- Discovery (Metadata) Document URL
- Client Id
- Client Secret or Certificate (Optional)
- Authorized Redirect URI
- Authorization Scopes
OpenID Connect Overview
The typical OpenID Connect flow works as follows. First, during the authorization step, the user is directed to the OpenID Provider's authentication page. Typically, the user will authenticate with the OpenID Provider and consent to the OpenID Provider providing their information to the Relying Party. The user is then redirected back to the Relying Party, where it will parse out the information from the incoming HTTP request.
The Relying Party will then complete the authentication step, which begins with a request to the token server. This request uses the authorization code obtained during the authorization step to prove that the user has provided consent to the token server. In response, the token server will supply the Relying Party with an Access Token, ID Token, and optional Refresh Token. Finally, to finish the authentication step, the user's ID Token is validated, and if successful, the user can be authenticated by the Relying Party.
The following section will focus on the OIDCWeb component but many of the same steps apply to the OIDCDesktop component. Instead of needing to split up the steps for setting up the authorization request and the processing of the request, all the setup is done before calling AuthenticateUser. A full example can be found here.
Requesting a Discovery Document
OpenID Providers will provide information about themselves at a specific "well-known" location. When a GET request is made to this location, it will return a "discovery document" that contains information about the various endpoints required to make requests. Along with these URLs, it will also provide information about their identifier, which will be used to check the issuer claim when validating an ID Token.
After this metadata document has been retrieved, it can be cached to an accessible location for the component. The component can then load the document directly, reducing the number of requests being made by the Relying Party.
oidc.RequestDiscoveryDoc("https://accounts.google.com/.well-known/openid-configuration");
string discoveryDocData = oidc.DiscoveryDocDetails.Content;


// Sometime later...


oidc.LoadDiscoveryDoc(discoveryDocData);
Once the metadata document has been loaded, the OIDCWeb or OIDCDesktop components are now prepared to build requests and verify responses.
Building an Authorization Request
Like the OAuth protocol that OpenID is built upon, the process typically consists of two steps. The first step is making an authorization request to the OpenID Provider, where a user will be prompted to authenticate with the provider. They will then provide consent for the OpenID Provider to share their information with the Relying Party. The user will then be redirected back to the Relying Party with proof of a successful authorization.
The OIDCWeb component will prepare the URL to which the user must be redirected to complete authentication. Set the ClientId, ReturnURL, AuthorizationScope, State, and UsePKCE properties and then call the GetAuthorizationURL method. The sections below provide additional details on individual properties.
Redirect URI (ReturnURL)
When a user has finished the authorization step with the OpenID Provider, they need to be redirected back to the Relying Party. This HTTP redirect needs to occur at a location where the Relying Party can parse the information needed to continue the authentication process for the user. The exact location of the redirect depends on the structure of the Relying Party.
The ReturnURL property should be set to the location within the web application that will handle parsing the information from the redirect.
For example, during the setup, the example registered "https://example.com/landing" with Google Identity. The web application code at this location can use the OIDCWeb component to parse the necessary information from the redirect. Once completed, the application will typically perform a second redirect to the page the user requested originally before logging in.
Authorization Scopes
OpenID Connect defines a set of standard authorization scopes that control what information will be available for the Relying Party to access.
| Scope | Description |
| openid | This is a required claim to inform the authorization server that this request intends to support the OpenID Connect standard. |
| profile | This scope requests access to the user's profile claims. This includes claims such as name, family_name, picture, and more. |
| This scope requests access to the email and email_verified claims. |
Along with OpenID Connect claims, some authorization servers also support various OAuth scopes. This allows your Relying Party to request both OpenID Connect consent and OAuth permissions at the same time. The AuthorizationScope property should be set to the scopes required for the Relying Party to function.
State
Sometimes information needs to be retained throughout the authorization process. The state parameter can be set when building a request. The OpenID Provider will return this information when it redirects the user back to the Relying Party. For example, this is commonly used to return the user to the page from which they initiated the authentication process.
PKCE
PKCE, or Proof Key for Code Exchange, is an extension of the OAuth 2.0 protocol that is often supported by OpenID Providers. PKCE adds additional security for public applications by introducing extra parameters to both the authorization and token server requests.
A simple overview of the flow starts with the generation of a random "code verifier." This verifier is used to create a "code challenge" that is sent in the first authorization request. Then, during the request to the token server, the original "code verifier" should be included. The token server will compare the challenge that was received earlier with the verifier that was sent.
The verifier must be securely stored somewhere. Each verifier is unique to its corresponding request, meaning it should be tied to the current user session in some way.
Offline Access
Google Identity uses the access_type parameter to be informed that an OAuth Client would like to use refresh tokens to access accounts when the user is offline. Simply put, this allows the application to get an updated Access Token and ID Token without needing the user to re-consent to the application having access to its account. To set the access_type parameter to offline, use the OIDCWeb component's AddParam method.
Code Example
A user currently on the home page, "https://example.com/home", clicks the login button. The Relying Party will build the request using the OIDCWeb component. The Relying Party will then use the OIDCWeb component's GetAuthorizationURL method to build the request and redirect the user to the authorization endpoint.
oidc.RequestDiscoveryDoc("https://accounts.google.com/.well-known/openid-configuration");
oidc.ClientId = "CLIENT_ID";
oidc.ReturnURL = "https://example.com/landing";
oidc.AuthorizationScope = "openid profile email";
oidc.State = "https://example.com/home";
oidc.UsePKCE = true;

oidc.AddParam("access_type", "offline");


string authUrl = oidc.GetAuthorizationURL();


HttpContext.Session.SetString("verifier", oidc.Config("PKCEVerifier"));


// Redirect the user's browser to authUrl
Processing an Authorization Response
Once the user has been directed to the OpenID Provider's authorization server, they will be asked to log in and provide consent for the OpenID Provider to share the requested information and permissions with the Relying Party. They will then be redirected back to the specified ReturnURL that was included in the request. This will appear as an HTTP GET request to the location specified.
Assuming the grant type is authorization code, the identity provider server will respond with an authorization code that will be used to obtain tokens from the token server. The OIDCWeb component can parse this information from the HTTP headers of the OIDC Response by setting the OIDCResponseHeaders and OIDCResponseBody properties. Optionally, if using ASP.NET or Java Spring, this information can be automatically retrieved from the environment.
Before processing the incoming request with the OIDC response, the OIDCWeb component needs to be set up with certain information. Similar to the authorization request, the following should be set, requested, or loaded:
- Discovery Document
- Client Id
- Return URL
- Authorization Scopes
- Application Credentials (Optional)
- Signing Certificates
- PKCE Settings (Optional)
More details on these settings can be found below. It is important to note that these settings should match how they were configured when making the request where applicable. For example, if PKCE was used in the Authorization Request, then it should be configured to process the response.
Application Credentials
If the Relying Party has a backend component separate from the user interface (e.g., an MVC Web Application), the OAuth 2.0 protocol recommends that the Relying Party registers a secret credential alongside the application's Client Id. These credentials are provided when making a request to the token server for the Access Token, ID Token, and Refresh Token. See Create New Credentials for details on obtaining a client secret.
Signing Certificates
A part of the OpenID Connect standard involves verifying the ID Token, which is a signed JWT. Before verification can be done, the signer's public certificate must be supplied to the OIDCWeb component. Typically, these certificates are hosted at a specific location and can be requested periodically. The location can be found through the "jwks_uri" field in the discovery document.
The OIDCWeb component can request the signer's public certificates using the RequestSignerCerts method. This method will make a request to the "jwks_uri" defined in the discovery document to obtain a JSON Web Key Set (JWKS) with one or more public keys used to verify the signed JWT. If the JWKS is missing when they are needed, the component will automatically retrieve it, but it can be useful to cache this value to reduce the frequency of downloads. The keys can be reloaded using the LoadSignerJWKS method.
oidc.RequestDiscoveryDoc("https://accounts.google.com/.well-known/openid-configuration");
oidc.RequestSignerCerts();
string signerJWKS = oidc.SignerJWKS;


// Sometime later...


oidc.LoadSignerJWKS(signerJWKS);
PKCE Verifier
If PKCE was used during the authorization step, the verifier must be provided for the authentication step. The PKCE verifier should have been securely stored during the authorization step and must be loaded back into the OIDCWeb component by setting the PKCEVerifier configuration setting before processing the HTTP request that contains the OIDC response.
Code Example
With everything set up, the OIDCWeb component can successfully parse the information from the authorization response, request tokens from the token server, and validate the ID Token for the user. In this example, the HttpContext object is passed to the OIDC constructor so that the component can read the request headers and body from the HTTP context object in ASP.NET Core. Alternatively, the OIDCResponseHeaders and OIDCResponseBody properties can be set to manually pass the information to the component.
OIDCWeb oidc = new OIDCWeb(HttpContext);


oidc.RequestDiscoveryDoc("https://accounts.google.com/.well-known/openid-configuration");
oidc.ClientId = "CLIENT_ID";
oidc.ClientSecret = "CLIENT_SECRET";
oidc.ReturnURL = "https://example.com/landing";


oidc.UsePKCE = true;
oidc.Config("PKCEVerifier=" + HttpContext.Session.GetString("verifier"));


oidc.ProcessOIDCResponse();


string accessToken = oidc.AccessToken;
string idToken = oidc.IdTokenInfo.IdTokenContent;
string refreshToken = oidc.RefreshToken;
string state = oidc.State;
Once the HTTP request with the OIDC response has been processed, the component will have obtained an access token along with the validated ID Token. This access token is a standard token produced by the OAuth 2.0 protocol and can be used to make requests to the UserInfo endpoint or other supported APIs depending on the scopes specified. Additionally, Google Identity may optionally provide a refresh token if the access_type parameter was set to offline when making the original request. This refresh token allows the application to obtain new access tokens and ID Tokens after the current ones expire, reducing the need for the user to authenticate directly with Google Identity.
Parse vs. Process
The simplest way to use the OIDCWeb component is by utilizing the ProcessOIDCResponse method. This method handles multiple steps of the OIDC flow at once, which are typically performed sequentially. However, the component also offers more granular control over the flow if needed. The ProcessOIDCResponse method effectively encompasses the following methods:
- ParseOIDCResponse
- RequestTokens
- ValidateIdToken
- RequestSignerCerts
- ParseIdToken
Note that RequestTokens is only used when the grant type is authorization code or hybrid, and RequestSignerCerts is only used if the certificates have not been loaded yet.
ID Token Validation
Whether using the ProcessOIDCResponse or ValidateIdToken methods, the component will validate the ID Tokens in the same manner. Initially, the signature of the JWT is verified using the signing keys provided by Google Identity. If the signature is valid, the iss (issuer) claim is checked to ensure it matches the value from the discovery document. Next, the aud (audience) claim is verified to match the Client Id of the Relying Party. The final checks include time-based claims such as iat (Issued At), exp (Expiration), and nbf (Not Before).
If the ID Token fails validation, the component will throw an exception with a specific code and description indicating the reason for the failure. Certain checks can be skipped using the IdTokenVerificationFlags configuration setting.
After a token has been validated, it is safe for the component to parse the information into the IdTokenInfo and UserDetails properties. If using the ProcessOIDCResponse method this is done automatically. Otherwise, the ParseIdToken method must be used. Additionally, the GetIdTokenClaim method can be used to retrieve specific or custom claims from the token.
Getting User Information
The OpenID Connect standard provides a mechanism to retrieve information about the authenticated user via the UserInfo endpoint. This endpoint uses the access token obtained during the authorization request to authenticate the application. In response, the UserInfo endpoint will return claims about the user that can be used to enhance and customize the user experience without needing to rely solely on the ID Token.
The UserInfo endpoint is defined in the discovery document. If the OIDCWeb component has already loaded the discovery document, call the RequestUserInfo method to obtain user information. Once the response is received from the UserInfo endpoint, the UserDetails property will be updated with the matching fields. Additionally, the GetUserInfoClaim method can be used to retrieve specific or custom claims not present in the UserDetails property.
OIDCDesktop Example
The OIDCDesktop component follows the same flow as the OIDCWeb component except it also handles the making the authorization requests and handling the authorization response for the desktop application. The following properties should be set before calling AuthenticateUser.
- Discovery Document
- Client Id
- Application Credentials (Optional)
- Web Server Port
- Return URL (Optional)
- Authorization Scopes
- Refresh Token
- Signing Certificates (Optional)
- PKCE Settings (Optional)
One standout difference is that the AuthenticateUser can also refresh tokens for a specific user using a RefreshToken when calling AuthenticateUser. In OIDCWeb, this is handled by calling RequestTokens instead. Another difference is that the component will automatically calculate the redirect URI meaning ReturnURL does not need to be set. As mentioned in the desktop considerations section, the WebServerPort property will need to be set to the specified port. Additionally, since the instance of the component does not change between sending the authorization request and receiving the response, the PKCEVerifier does not need to be saved.
Once ready, calling AuthenticateUser will have the component launch a browser window for the user, start up an embedded web server, and wait for the authorization response. Once the response is received it will automatically process the results and get the tokens from the token server. If an ID token is received and no errors are thrown, then the user is authenticated.
oidc = new OIDCDesktop();
oidc.RequestDiscoveryDoc("DISCOVERY_DOC_URL");


oidc.ClientId = "CLIENT_ID";
oidc.ClientSecret = "CLIENT_SECRET";
oidc.AuthorizationScope = "openid profile email";
oidc.State = "STATE";
oidc.UsePKCE = true;
oidc.WebServerPort = 8080;


oidc.AuthenticateUser();
We appreciate your feedback. If you have any questions, comments, or suggestions about this article please contact our support team at support@nsoftware.com.