
IPWorks Jabber Client
Requirements:
IPWorks .NET Edition
Download Demo: Download
Chapter Listing
- XMPP
- Getting Started
- Login
- Register
- Buddy List
- Presence
- Sending Messages
- Incoming Messages
- Adding and Removing Buddies
- Subscription Requests
- Jabber X Events
- SSL
XMPP
In October of 2004, Jabber (or XMPP, eXtensible Messaging and Presence Protocol) became an IETF Internet standard. Even before this happened, Jabber had already made a big splash and was already in wide use. In fact, there has been an XMPP component included in IPWorks since November of 2002.
What is Jabber? It is the common name for the XMPP protocol. It is the most powerful instant messaging tool available. That's a big statement, but I can back it up.
- Jabber is an "open" protocol. For IM application developers, this means that any changes in how the protocol works, or new features in the protocol are documented publicly.
- You can have control over the server, rather than relying on a massive public server that everyone uses. This can make your messaging more reliable, and more secure.
- Jabber can be used on your own local network strictly, or opened up to allow remote connections in and out.
- Jabber can choose to use SSL security so that your implementation is safe and secure. This is very important for business applications and something that most IM clients do not provide.
- No one owns XMPP. You can do with it what you like.
The XMPP component in IPWorks implements the core, instant messaging and presence functionality of the Jabber protocol in an easy-to-use event driven interface. Incoming messages and presence notifications arrive in events, and messages and other "actions" are sent via the XMPP component's set of object methods.
In this article I'll walk through coding an XMPP (Jabber) instant message application in VB .NET using the XMPP component included in IPWorks Internet Toolkit. The full IM application can be downloaded here, and is a fully functional Jabber chat demo application.
Getting Started
I'll organize my client into 4 main Winforms:
- Login.vb
- Register.vb
- Main.vb
- AddBuddy.vb
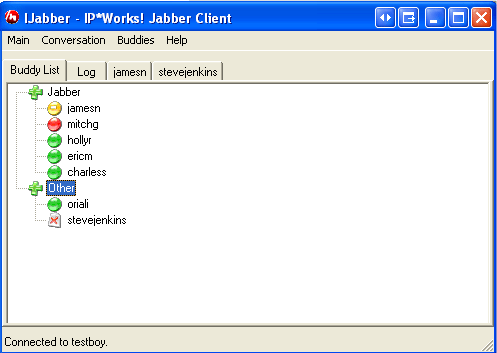
Main.vb will contain the startup class. Its GUI will include a MainMenu component which will allow the user to launch the remaining forms. A "Login" menu option will launch the Login form (from which the Register form can be reached), and an "Add Buddy" menu option will launch the AddBuddy form. The Main form will consist mainly of a TabControl. At design time I've created two permanent tabs; a "Buddy List" tab and a "Log" tab. The "Buddy List" tab contains only a TreeView control that will be used to display the buddy list, or roster. The Log tab will contain a log of all of the communication between the XMPP component and the server, which I will get from the PITrail event of the component.
The Login form will be for nothing more than taking the user's login information. The Register form will be for nothing more than taking the user's registration information (for new accounts). The AddBuddy form will of course be for adding new buddies to the roster.
Login
When the user selects the "Login" menu option, the Login form will be created and shown with ShowDialog.
Private Sub mnuLogin_Click(...) Handles mnuLogin.Click
    If mnuLogin.Text = "&Login..." Then
        XMPPLogin()
    Else
        'Logout
        Me.Cursor = Cursors.WaitCursor
        Xmpp1.Disconnect()
        tvwRoster.Nodes.Clear()
        mnuBuddies.Enabled = False
        mnuLogin.Text = "&Login..."
        Me.Cursor = Cursors.Default
    End If
End Sub
The Login form will contain TextBoxes for the user to input server, jabber Id, and password information. The only other items in this form will be buttons for Cancel, Register, and OK. The Cancel button is obvious. The Register button will bring up the Register form and the OK button will Hide the form, causing the initial ShowDialog() call to return. At this point, I will call the XMPP Connect method, passing it the authentication information contained on the Login form.
    Private Sub XMPPLogin()
        Dim loginfrm As New Login
        loginfrm.ShowDialog()

        If Not loginfrm.Cancelled Then
            Try
                Me.Cursor = Cursors.WaitCursor
                Xmpp1.IMServer = loginfrm.tbServer.Text
                Xmpp1.Connect(loginfrm.tbUser.Text, loginfrm.tbPassword.Text)
            Catch ex1 As Exception
                MessageBox.Show("Error connecting: " + ex1.Message, ...)
            Finally
                If Xmpp1.Connected Then
                    mnuLogin.Text = "&Logout"
                End If
                loginfrm.Close()
                Me.Cursor = Cursors.Default
            End Try
        End If

    End Sub
If the user doesn't have an account on the Jabber server, they should register for one. This is the purpose of the Register button on the form. When this button is clicked, an instance of the Register form is created and shown with ShowDialog(). After the registration is complete, the user can then login to the server.
Register
Jabber registration is the two step process of creating an account on a jabber server. The first step is to query the jabber server for what information it requires in order to create an account. The component does this with the QueryRegister method. After a call to QueryRegister, the required registration information is provided to the component in the UserInfo collection. UserInfo.Count is the number of fields that the server requires. UserInfo(i).Field is the string name of each required field. All items in the UserInfo collection also have a Value, which will initially be an empty string, but should be set to the correct values for the corresponding field as shown in the next example.
The possible registration fields are defined in the Jabber protocol specification as follows:
| instructions | Special instructions sent from the server. |
| username | The username to be associated with this account. |
| password | The initial password for this account. |
| name | The user's name. |
| The user's email address. | |
| address | The user's physical address. |
| city | The user's city of residence. |
| state | The user's state (for United States citizens). |
| zip | The user's postal code (for United States citizens). |
| phone | The user's phone number. |
| url | The user's website. |
| date | The date of registration. |
| misc | Any miscellaneous data. |
| text | Any extra text (potentially for a personal bio). |
| remove | Specifies a request to un-register. |
The Register form will initially contain nothing but two buttons: Cancel and OK. As for the user info fields required by the server - I'll go ahead and perform the QueryRegister method call in the constructor of the Register form. This will allow me to find out what fields I need and then dynamically create Label and TextBox components for each required field.
Public Sub New(server As String, user As String, password As String)
    MyBase.New()

    'This call is required by the Windows Form Designer.
    InitializeComponent()

    'Add any initialization after the InitializeComponent() call

    'Global so that I always know how many controls are on the form before
    'I start dynamically adding them.
		BaseControlIndex = Me.Controls.Count - 1

    IMServer = server
    Xmpp1.QueryRegister(IMServer)
    Dim i As Integer
    For i = 1 To Xmpp1.UserInfo.Count
        CreateComponents(Xmpp1.UserInfo(i).Field), 16, 20 + (28 * i))
    Next
End Sub

...

Private Sub CreateComponents(lbtext As String, x As Integer, y As Integer)
    Dim Label1 As System.Windows.Forms.Label
    Dim TextBox1 As System.Windows.Forms.TextBox

    Label1 = New System.Windows.Forms.Label
    TextBox1 = New System.Windows.Forms.TextBox

    '
    'form
    '
    Me.Height += 28

    '
    'Label1
    '
    Label1.AutoSize = True
    Label1.Location = New System.Drawing.Point(x, y)
    Label1.Name = "Label1"
    Label1.Size = New System.Drawing.Size(38, 16)
    Label1.TabIndex = 0
    Label1.Text = lbtext
    Controls.Add(Label1)
    '
    'TextBox1
    '
    TextBox1.Anchor = ...
    TextBox1.Location = New Point(x + (Controls(Controls.Count-1).Width)+15, y-2)
    TextBox1.Name = "TextBox1"
    TextBox1.Size = New Size(Width - (x + Controls(Controls.Count-1).Width)-35, 20)
    TextBox1.TabIndex = 1
    TextBox1.Text = ""

    Me.Controls.Add(TextBox1)
End Sub
After the user has set all of the values in the TextBox fields on the form, they will click the OK button. This is where I will set the appropriate values to the UserInfo collection of the XMPP component. Then I will simply call the Register method, which will send the Register request to the server.
Private Sub bOK_Click(...) Handles bOK.Click
    Me.Cursor = Cursors.WaitCursor
    'populate the userInfo Fields:
    Dim i As Integer
    For i = 1 To Xmpp1.UserInfo.Count
        Xmpp1.UserInfo(i).Value = Me.Controls(BaseControlIndex + (i * 2)).Text
    Next

    'perform the register
    Try
        Xmpp1.Register(IMServer)
    Catch ex1 As Exception
        MessageBox.Show("Error registering: " + ex1.Message, ...)
    Finally
        Xmpp1.Disconnect()
        Me.Cursor = Cursors.Default
    End Try
    Me.Hide()
End Sub
Buddy List
After connecting to the Jabber server with the Connect method, the XMPP component will automatically retrieve the "roster", or buddylist, from the server. When finished, the Sync event will fire, signaling that the Buddies collection has been refreshed, and is in sync with the server. It is in this event that I will populate the TreeView roster that I have on the Main form.
The Buddies collection I refer to looks like this:
| Buddies.Count | The number of users in the buddy list. |
| Buddies(i).Id | The Jabber Id (JID) associated with the buddies. |
| Buddies(i).Group | The group associated with each entry (if a buddy is in more than one group, this will be a comma-separated list of those groups). |
| Buddies(i).Subscription | The subscription type for each buddy. |
Buddies.Count is an integer value. Buddies(i).Id and Buddies(i).Group are both strings. Buddies(i).Subscription is an enumeration with the following possible values:
- 0, stNone: No subscription
- 1, stTo: The buddy has a subscription to this entity.
- 2, stFrom: This entity has a subscription to the buddy
- 3, stBoth: Subscription is both to and from
- 4, stRemove: The item is to be removed from the list
When the Sync event fires and this buddy information is ready, I can populate the TreeView roster:
Private Sub Xmpp1_OnSync(...) Handles Xmpp1.OnSync

    'First, I'll find out what groups exist in the roster by looping
    'through the Buddy groups, and add them to a hashtable
    'called BuddyGroups:
    Dim i As Integer
    For i = 1 To Xmpp1.Buddies.Count
        Try
            If Xmpp1.Buddies(i).Group <> "" Then
                BuddyGroups.Add(Xmpp1.Buddies(i).Group, Xmpp1.Buddies(i).Group)
            Else
                BuddyGroups.Add("Other", Xmpp1.Buddies(i).Group)
            End If
        Catch
        End Try
    Next


    'Next, add all the groups and buddies to the tvwRoster:
    Dim group As DictionaryEntry
    For Each group In BuddyGroups
        'create group node:
        Dim groupNode As TreeNode
        groupNode = tvwRoster.Nodes.Add(group.Value)

        'add buddies to the group
        For i = 1 To Xmpp1.Buddies.Count
            If Xmpp1.Buddies(i).Group.Equals(group.Value) Then
                Dim newnode As TreeNode = New TreeNode(Xmpp1.Buddies(i).Id)
                groupNode.Nodes.Add(newnode)
            End If
        Next
    Next

End Sub
Presence
I mentioned previously that if a user has a subscription to a buddy, the user will receive presence notifications from that buddy. With the XMPP component, incoming presence notifications will arrive in the Presence event. Whereas the Buddies collection tells me who my buddies are, The Presence event tells me if those buddies are available. The events Availability parameter can have any of the following values:- JabberId is offline.
- JabberId is online.
- JabberId is online, but away
- JabberId is online, but extended away
- JabberId is online, but do not disturb
Sending Messages
At this point I can register a new account, login, and populate a buddy list. My app will open a new chat window by double-clicking on a buddy in the TreeView roster. When a buddy is double-clicked, I'll first check to see if there has already been a tab created for this buddy. If so, I'll go to that tab. If not, I'll create a new tab in the TabControl, titled with the Jabber Id of the target buddy.
Private Sub tvwRoster_DoubleClick(...) Handles tvwRoster.DoubleClick
    'Double clicked on a buddy, so open a new conversation tab for this buddy:
    Dim foundpage As Boolean = False
    Dim i As Integer
    For i = 0 To tcChats.TabPages.Count - 1
        If tcChats.TabPages(i).Text = tvwRoster.SelectedNode.Text Then
            'a chat with this buddy already exists, modify it:
            ReclaimChat(i)
            foundpage = True
            Exit Sub
        End If
    Next
    If Not foundpage Then
        'this is a new conversation, start it:
        NewChat(tvwRoster.SelectedNode.Text)
    End If
End Sub
If the chat is new - NewChat gets called. If the chat already exists ReclaimChat gets called. The only differences in the two are that NewChat creates a new tab with two RichTextBox components - one for composing outgoing messages, and one to contain the entire text of the conversation between the user and the buddy. Both of these functions set the SelectedIndex of the TabControl so that the correct chat tab is visible.
Each chat Tab contains two RichTextBox components: txtConversation and txtCompose. When the user types into the txtCompose RichTextBox, if the character typed is the ENTER key (Keys.Enter), the XMPP components SendMessage method is called to send the content of the RichTextBox to the buddy:
        Xmpp1.MessageText = txtCompose.Text
        Xmpp1.MessageType = XmppMessageTypes.mtChat
        Xmpp1.SendMessage(jid)

        AddToConversation(txtConversation, Xmpp1.User, msg)
Everything that is sent out is also added to the txtConversation tab, along with everything that is received (which I'll discuss next). For this, I have a subroutine called AddToConversation, which takes as an argument a RichTextBox parameter so that I can use the same subroutine to output to any RichTextBox I need to (ie, the Log Tab). AddToConversation outputs the text in a color depending on the second argument, sndr (sender), so that conversations and the log are easier to read quickly.
Private Sub AddToConversation(target As RichTextBox, sndr As String, text As String)
        'make outgoing and incoming messages appear differently
        Select Case sndr
            Case Xmpp1.User
                target.SelectionColor = Color.Blue
            Case "CLIENT"
                target.SelectionColor = Color.Blue
            Case "SERVER"
                target.SelectionColor = Color.Red
            Case "INFO"
                target.SelectionColor = Color.Green
            Case Else 'buddies
                target.SelectionColor = Color.Red
        End Select

        target.AppendText(" " + sender + ": " + text + vbCrLf)
        target.ScrollToCaret()
 End Sub
Incoming Messages
Anytime a message comes in, the MessageIn event will fire containing the content of the message, including the sender and the text and html parts of the message body itself.
Inside the MessageIn event, the initial urge would to be to output the incoming message to the appropriate chat window - but there is more to it that.
In .Net, GUI components have to be accessed only from the GUI thread, but by default, the MessageIn event will fire on a different thread than the GUI. I can make the component fire the events from the GUI thread by setting the InvokeThrough property to the main form. Alternatively, I could fire my own delegate on the main thread. For more information about this, please see Knowledge Base entry 12060401. I'll let the component do the work for me here by setting the InvokeThrough property in the designer to "Form1".
To continue, now we are in the MessageIn event and it was fired from the GUI thread:Sub MyXmppMessageIn(sender As Object, e As XmppMessageInEventArgs) 'look to see who the message is from and send to the appropriate tab Dim i As Integer i = ChatExists(e.From) If i > 0 Then 'add the message to an existing chat tab AddToConversation(Me.tcChats.TabPages(i).Controls(0), buddy, text) Else 'create a new chat tab NewChat(buddy, False) AddToConversation(tcChats.TabPages(tcChats.TabPages.Count-1).Controls(0), buddy, text) End If End Sub
Above, the ChatExists function simply loops through the TabControl tabs checking to see if I already have a chat for this particular buddy. If a chat for this buddy already exists, that tab's txtConversation RichTextBox is updated with the new message text. If a chat for the buddy does not exist yet, one is created using the same NewChat method that I used previously.
Adding and Removing Buddies
The Main form MainMenu includes a Buddies menu where the user can add and remove buddies from the TreeView roster. If the user clicks on the add buddy menu option I call ShowDialog on an instance of the AddBuddy form. This form contains just Label and TextBox components for the user to input the Jabber Id, Alias, and group for the buddy they'd like to add. There is also an OK button, that when clicked will close the AddBuddy form. Inside the Main form I catch the Closing event of this form where I simply add the buddy by calling the Add and SubscribeTo methods of the component. This is shown in the code below.
    Xmpp1.Add(AddFrm.tbJabberID.Text, AddFrm.tbAlias.Text, AddFrm.cbGroup.Text)
    Xmpp1.SubscribeTo(AddFrm.tbJabberID.Text)
In the code above, tbJabberID.Text should be of the form buddy@domain.
Removing a buddy from my roster is just as simple. Simply call the Remove method of the XMPP component, like so:
Xmpp1.Remove("buddy@domain", "alias", "")
At any time, I can also ask the server to send me its copy of the roster by calling the XMPP RetrieveRoster method. This will result in another Sync event, so I can rebuild my roster again:
    tvwRoster.Nodes.Clear()
    Xmpp1.RetrieveRoster()
Subscription Requests
When a user requests to subscribe to a buddy, the buddy must approve that subscription. If a remote buddy requests a subscription to the user logged on with the XMPP component, the SubscriptionRequest event will fire. The Accept parameter of this event will always be set to false, meaning to reject all subscription requests. In order to allow the subscription, I must set the Accept parameter to true. In my SubscriptionRequest event handler, I prompt the user for this decision. I also prompt the user to find out if they want to add this requesting person to their buddy list.
Sub MyXmppSubscriptionRequest(...)
    If MessageBox.Show("Allow " + e.From + ...) = DialogResult.Yes Then
        e.Accept = True
    End If
    If MessageBox.Show("Add " + e.From + ...) = DialogResult.Yes Then
        'add the buddy
        AddFrm = New AddBuddy(BuddyGroups, getCurrentGroup())
        AddFrm.tbJabberID.Text = e.From + "@" + e.Domain
        AddFrm.tbAlias.Text = e.From
        AddFrm.Show()
    End If
End Sub
Above are two notable things. The getCurrentGroup function just returns the string value of the currently selected group in the TreeView (if any). Secondly, note that I use Show rather than ShowDialog. This is necessary because I must finish the subscription request conversation with the server before I can go and add a buddy. So using Show allows the SubscriptionRequest method to return immediately, thus sending the allow/disallow notification to the server. After that is done, I can add a buddy without causing any confusion with the server.
Jabber X Events
X Events are not a part of the actual XMPP specification, however they are commonly used in practice. Since they are not a part of the specification, the component does not implement them. With a few tricks, I can add code to handle X:event messages myself.
Jabber:x:event message elements allow for some extended functionality, such as "composing" notification, which I've implemented in this demo application. The "composing" element is used to notify the remote buddy that a new message is currently being composed.
To send a message saying that I am currently composing, I would simply send a command to the server containing a message with no body, and with an x element with an empty composing tag, ie:
Xmpp1.SendCommand("<message from='me@domain' to='buddy@domain'
         type='chat'><x xmlns='jabber:x:event'><
         composing></composing></x></message>")
In order to cancel a previously sent composing notification (like if I stop typing for a while), I resend the same command, except without the composing element:
Xmpp1.SendCommand("<message from='me@domain' to='buddy@domain'
         type='chat'><x xmlns='jabber:x:event'></x></message>")
Receiving x:event messages is a bit more complicated. The MessageIn event doesn't provide the raw XML of the messages - just the from, body, and html information about the message. For this reason I'll need to use the PITrail event of the XMPP component to inspect the raw XML of every message sent. I insert the following into my PITrail event:
If IsXEvent(e.Pi) Then HandleXEvent(e.Pi)
IsXEvent is a simple function that returns true if the message bent sent contains the element "jabber:x:event". Inside HandleXEvent, I first make sure the message is not from myself using a function called FromWho. If its not, I take one of three courses:
- If there is a composing tag and a body tag, this is a regular message that contains a composing element as a sign that the sender of the message supports compose notifications. Take no action here.
- If there is a composing tag but there is NOT a body tag, then this is a composing notification. I call SetComposing and give it true as the first argument.
- If there is no composing tag, then this is not a compose notification, or it is a cancellation. I call SetComposing and give it false as the first argument.
Private Sub HandleXEvent(ByVal Pi As String)
    Dim fromjid As String = FromWho(Pi)
    If fromjid = Xmpp1.User Then Exit Sub

    If (Pi.IndexOf("<composing") >= 0) And (Pi.IndexOf("<body") >= 0) Then
        'if there is a composing tag and a body tag - then this is a regular message
        'buddy is not composing
        Console.WriteLine(fromjid + " sent the message")
        'SetComposing(False, fromjid)
    ElseIf (Pi.IndexOf("<composing") >= 0) Then
        'if there is a composing tag and NOT a body tag - then this is a composing message
        'buddy is composing
        Console.WriteLine(fromjid + " is composing")
        SetComposing(True, fromjid)
    ElseIf (Pi.IndexOf("jabber:x:event") >= 0) Then
        'if this is an x:event but is not a composing tag, since that is all I requested
        'I can assume this is a cancellation of a previous compose event
        'buddy is not composing
        Console.WriteLine(fromjid + " is not composing")
        SetComposing(False, fromjid)
    End If

End Sub
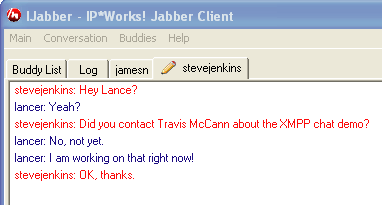
I use the Boolean argument of SetComposing to determine an image index to set on the Tab of the chat that this sending user is involved in. If I receive a composing message, SetComposing(true, fromjid) results in the view shown below.
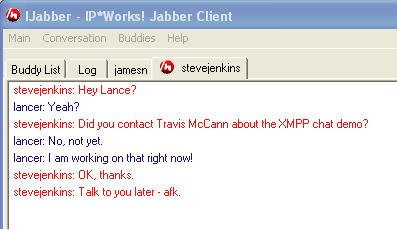
After the buddy sends their message, it will be accompanied by a compose cancel. However, I added code to the ReclaimChat and NewChat functions to show me when a new message has arrived that I've not seen yet. So after the message my buddy is composing gets sent, I get the view shown below.
SSL
To add SSL capabilities to this demo, only a few changes are required:- First and most obviously, a Jabber server that supports SSL.
- The XMPP component needs to be swapped out and replaced with the XMPPS component that is included in IPWorks.
- The event definitions and delegate declarations need to be updated to reflect the slightly changed event signature (ie, XmppSMessageInEventArgs instead of XmppMessageInEventArgs).
- Any references to "nsoftware.IPWorks" will need to be replaced with "nsoftware.IPWorksSSL".
- Any references to "nsoftware.IPWorks.XMPP" need to be replaced with "nsoftware.IPWorksSSL.XMPPS".
- Finally, I'll need to add the SSLServerAuthentication event, which will allow me to manually inspect the certificate presented by the server. This way, if the certificate presented by the server is invalid or not trusted by the client machine (install the certificate of the Issuer!) I can choose to manually accept the certificate anyway.
Get The Demo
You can download the demo here.
We appreciate your feedback. If you have any questions, comments, or suggestions about this article please contact our support team at kb@nsoftware.com.